AE Tips and Tricks

Monday, September 7, 2009

It's Not The Camera

There's been a lot of excitement about SLR's that shoot video. Debates over ergonomics, rolling shutter (jello cam), compression, frame rates, and sutibility can be found everywhere. The just announced Canon EOS 7D has included a lot of the features film makers found lacking in the Canon 5D Mark II.


Is this the perfect camera? Nope. There is no perfect camera.

Will someone make a film with this camera that touches, inspires, makes a boatload of money? Maybe.

In the early eighties a good friend of mine made a commercial using a Bell and Howell Eyemo 35mm camera and a sandbag instead of a tripod. His concept was brilliant. The story worked. He won a fistfull of awards and new clients that brought him enough money to buy a few lenses and a tripod.

So what's the point?

The point is that the idea and the execution is more important than the camera. If I land a project where the budget is so limited that I can only aford to shoot ony iPhone then I'll make adjustments and shoot on the iPhone. If there's budget to shoot Panavision then that's my tool of choice. Making movies is and always has been about doing the best job you can with the tools and idea you have.

There may be a digital SLR capable of shooting HD video in my future. If there is it will just be another tool that I use to bring an idea to life.

Thursday, July 10, 2008

Advanced Extrusion with Shatter

This is a fairly simple technique often done poorly. The trick to making the 3D extrusion look as good as possible is in the way you use a custom shape layer and the way you assign textures to the extrusion.

For this example I am using AE's comp camera and a point light to view the extrusion layer. I've added a different color to the extruded edges and also added the background color to the back of the extrusion. A 3D duplicate of the text layer used as a custom shape is set to cast shadows only and the material options of Shatter have been adjusted.

I've included a short video tutorial of the procedure that you'll find HERE. I hope you enjoy. Please let me know if you have any questions. The project files are in this 3DTxt.zip file.

Friday, November 30, 2007

Advanced Displacement Maps

I've recently seen a lot of questions about setting up and using displacement maps in After Effects. To help better understand how to use the effect I thought I'd bring back a sample project from 2002 using AE 5.

Basic displacement
Displacement uses the color channels of a layer to move pixels. The amount of movement is directly proportional to the pixel value. If you're working in 8 bit and in Y only then a pixel value of 0 moves the pixel you're displacing the maximum distance down while 255 moves the pixels up. Gray doesn't move pixels. The example to the right has Y displacement set to 40 pixels.

Complex disteortion
Let's say you wanted to create a spherical distortion. You could create a fancy gradient in Photoshop, but you’d need to spend a long time experimenting with the proper color values or doing some fairly complex math. There are 2 easy ways to create this gradient. The first, and most accurate, would be to use a 3D app and light a sphere using red and negative red lights on the left and right with green and negative green on the top and bottom. The second option, and the one used in the sample project, is to light a solid in AE with red and green lights in the same way you'd light the sphere in a 3D app.


Here's a displacement project that uses the color channels of a pre-comp created with the technique I just discribed. The first thing to do when you start experimenting with the project is to turn the red pair of lights on and off. In these examples I’ve set vertical displacement to green and 40 pixels. Horizontal displacement is turned off. As you can see, there is no difference in vertical displacement when I turn on the red lights. Setting the Horizontal displacement to Red and animating the colored pairs of lights gives us this keen little movie.

I hope you’ll find the project enlightening. If I get time I may try and create a more in depth video tutorial on displacement.


Wednesday, November 21, 2007

Square Wheels


There was a request recently for help rolling a square object along a floor so that the sides stayed in contact with the floor plane. I came up with a fairly simple solution by adding expressions to the anchor point and position property of a square and then rolling it along by adjusting rotation.


The approach:

The easiest way to rotate on a corner is to simply move the anchor point to the corner. The challenge is to switch corners automatically every 90º. If I divide rotation by 90 and use Math.floor(value) I can create a counter that goes from 0 to 3 in the first rotation. To make the number repeat I'll use the % 4 function. So far the expression looks like this:

count = Math.floor(rotation / 90);
num = count;
val = ( num % 4);

To keep the value from going negative I can add 100 to the number (num). This will give me 25 rotations in the negative direction before my value goes negative.

Now it's just a matter of adding a few if else statements. The final Anchor point expression looks like this:

count = Math.floor(rotation / 90);
num = count + 100;
val = ( num % 4);

if (val == 0) {
  [width, height]
}
else if (val == 1) {
  [width, 0]
}
else if (val == 2) {
  [0, 0]
}
else
  [0, height]

I used width and height instead of the values for the layer so the expression would work with any square layer of any size.

The last step is to modify the position of the X value by multiplying the rounded count by the width of the layer. The expression should be fairly easy to understand and looks like this:

val = Math.floor(rotation / 90);
x = value[0] + val * width;
y = value[1]; 
[x, y]

The only thing left to do is animate the rotation value. You'll find a project for AE CS3 here I hope you enjoy...

Sunday, October 7, 2007

AVCHD - Ready for Prime Time?

Panasonic HDC SD5 camera and evaluating whether or not it offered a viable solution to full 1080i production on the cheap. While the camera produced some surprisingly good images and was very comfortable to use, the biggest problem turned out to be interlacing issues, followed by compression artifacts and lastly, motion artifacts from the GOP stream.

Getting the footage loaded up on my Mac wasn't the problem. You simply copy the clips from the SD card to your computer and then drop them with the Voltaic HD converter from Mas1080HD.com . The conversion to the Apple Intermediate codec takes quite a bit of time, about 12 to 1 on my machine, but you end up with a full rez square pixel 1080i file. I'm starting to get excited. The test clip looked just fine in QT pro and played back without problems.

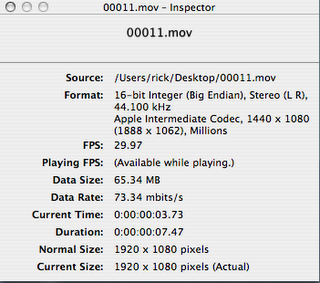
The trouble began when I imported the QT into After Effects. For some reaspm the clip is interpreted at HDV size of 1440 X and the frame rate was interpreted at 30.09 fps. I could easily fix the frame rate by interpreting the footage at 29.97 but fixing the size was another problem. The solution was to export to any one of several compatible codecs from QT pro. I chose PhotoJpg. Now the footage opens correctly in AE but there's still a problem. I separated fields then doubled the frame rate of the comp to check for things like motion artifacts from the heavy AVCHD GOP compression. I shot some cars driving by on a freeway from my hotel room window. At first, everything looked fine and I thought that I might have found a fairly acceptable HD format on the cheap. Then I noticed something odd. About every 70 or 80 fields there was a field out of order. The strange thing was that it wasn't consistent. The only thing I could figure out was that the decoder from Mac1080HD was fouling up every once in a while decoding the GOP stream into fields.

I thought I'd try capturing in iMovie HD from iLife 08 which supports AVCHD. I didn't have Final Cut installed on the test machine. The conversion to the Apple Intermediate Codec is much faster, but the size problem is still there and so is the random field reversal. It was time to give the camera back and also time to do other things. Except for this field problem and the time it takes to get the footage into a usable format for post, this little camera produced some remarkable images. Don't get me wrong, there are compression artifacts that show up in the shadows, and the picture from the tiny chips and itty-biddy lens will never match up to more professional rigs. The extra resolution may be enough to hide some of the problems if the footage is downsized to HDV or 720P resolution if the field problem and the frame rate problem can be solved and the AVCHD compression algorithm can be improved a bit more. If I get a chance I'll post a short bit of this test footage on the site.

Monday, July 16, 2007

Flying A Kite

Here's a simple project using expressions to tie a string to a kite and fly it around in 3D space. The point one layer at another then adjust the X scale so that the layer always reaches the target. You can apply this technique to other projects. I hope you enjoy this tutorial.

I created a layer called String and a layer called Kite. I drew an open mask on the String layer that shaped a gentle arc, added the Stroke effect with a width of 3 pixels and Paint on Transparent selected. The stroke goes from the left edge to the right edge of the String layer, and that's important. The String layer is slightly narrower than the comp to make it easy to work with. The last step with the String layer is to move the anchor point to the left most vertice point of the mask at exactly an X value of 0. this is also important. Both layers are converted to 3D.

The Kite layer is simply a square solid with a kite shaped mask and the anchor point moved to where the string would attach.

The following expressions are added to the string layer:
String Scale:
point1 = position;
point2 = thisComp.layer("Kite").position;
L = length(point1, point2);
w = thisLayer.width;
r = L/w*100;

[r, value[1], value [2]]
String Orientation:
t = thisComp.layer("Kite");
l = thisComp.layer("String");

fromPoint = l.position
atPoint = t.position
lookAt(fromPoint, atPoint)
If you look carefully at the language you'll see that I'm calculating the distance between the anchor points and then dividing the distance by the layer width and multiplying that number by 100 to arrive at a scale factor so that the String layer is always the same length as the distance between the end of the string and the kite. The Orientation part of the expression simply points the string at the kite. There is one problem that must be overome. The string layer is perpendicular to the Kite so, and this part is important, the Y rotation must be changed to -90 to get things back to normal. This isn't another expression, it's just a value you put in.

The Kite layer also needs an expression to point the kite at the end of the string. The Kite orientation expression is basically the same as the String Orientation expression with definitions for the from and at point reversed. It looks like this:
Kite Orientation:
t = thisComp.layer("String");
l = thisComp.layer("String");

fromPoint = t.toWorld(position);
atPoint = l.toWorld(thisComp.layer("String").anchorPoint);
lookAt(fromPoint, atPoint)
Now the kite can be moved around and the string will follow.
You should find a sample 6.5 comp Here. I added a coupple of wiggle expressions to move the kite around. It was a fun way to spend a half hour this evening.